Banshee’s wiring merge guide

DISCLAIMER:
You are about to rip your entire car apart, this is one of the most difficult and involved processes with these cars and its very easy to screw everything up. You will be completely gutting two cars using the guts from one to power another. Investing all of your time and money into this process is costly both physically and mentally so read through this and decide if your actually up for it. Many enthusiasts and vendors are giving up doing these merges over the years, if you use this guide for your harness please give me feedback to improve this for others.
Wire guide revision contents (V1.3.1) :
Added all 2002-2005 WRX 2.0 (EJ205) donor ECU pinouts and wire colors
Added all 1998-2001 2.5 RS Impreza models
Added 1993-1996 1.8 and 2.2 Impreza models
Added 2004 STI to 99-01 RS
Note: Legacy and Forester models will be added in a later revision, DBW motors is a work in progress, 04 STI to 99-01RS is done. EG33 pinouts are also on the way. If you have a request for a page to be made for a specific merge let me know
Download the wiring guide here
PART 1: Introduction on how to read wires
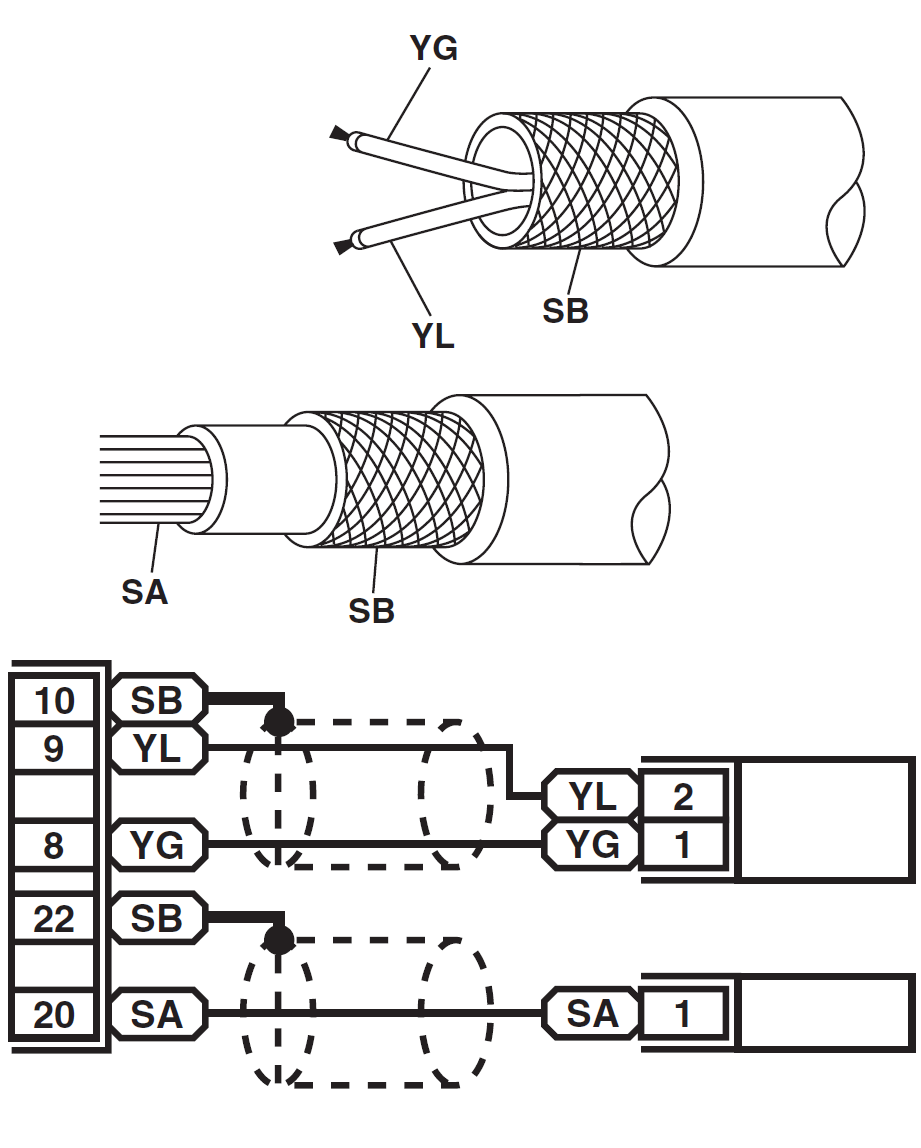
Each connector and its terminal position are indicated by a sketch of the connector in a disconnected state which is viewed from the front, as shown below.
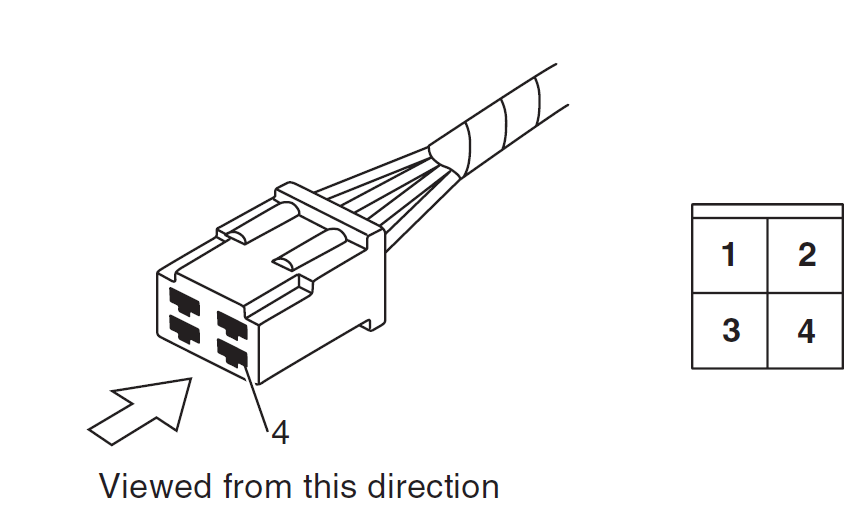
When one set of connectors is viewed from the front side, the pole numbers of one connector are symmetrical to those of the other. When these two connectors are connected as a unit, the poles which have the same number are joined.

The sketch of each connector in the wiring diagram usually shows the “A” side of the connector. The relationship between the wire color, terminal number and connector is described in figure. NOTE: A wire which runs in one direction from a connector terminal sometimes may have a different color from that which runs in the other direction from that terminal.
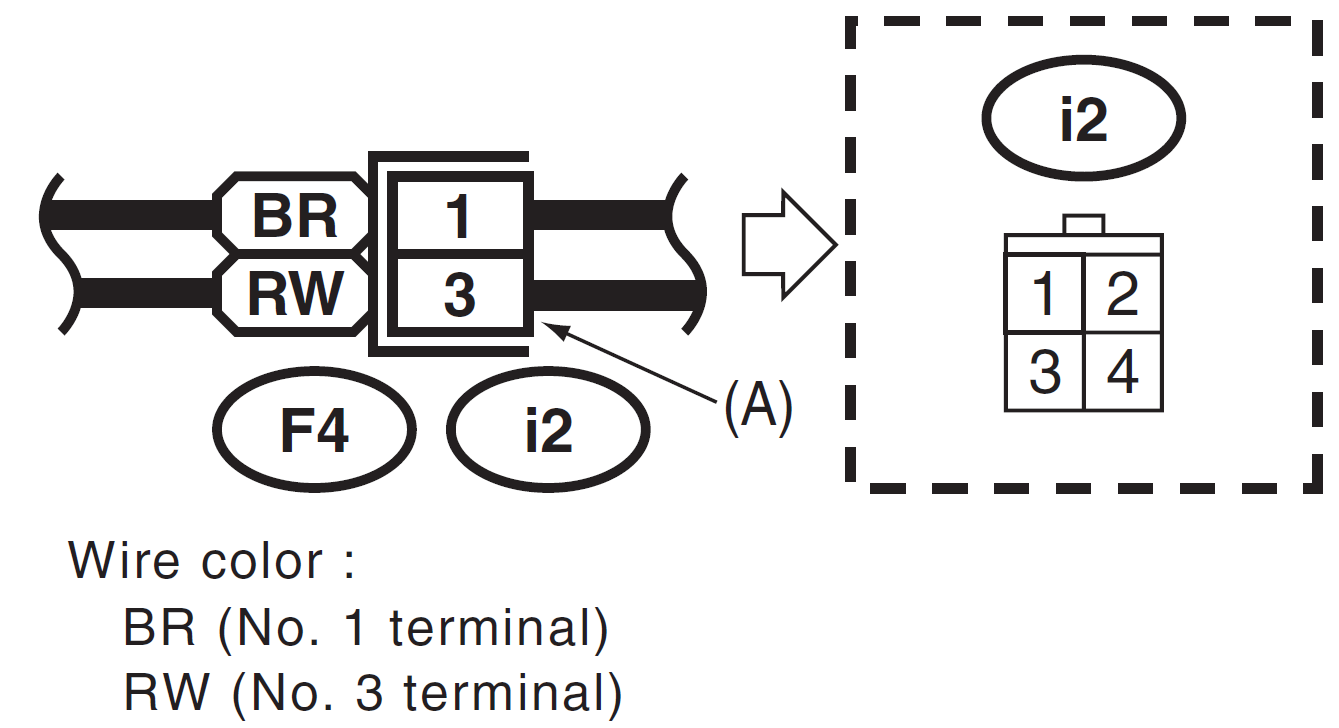
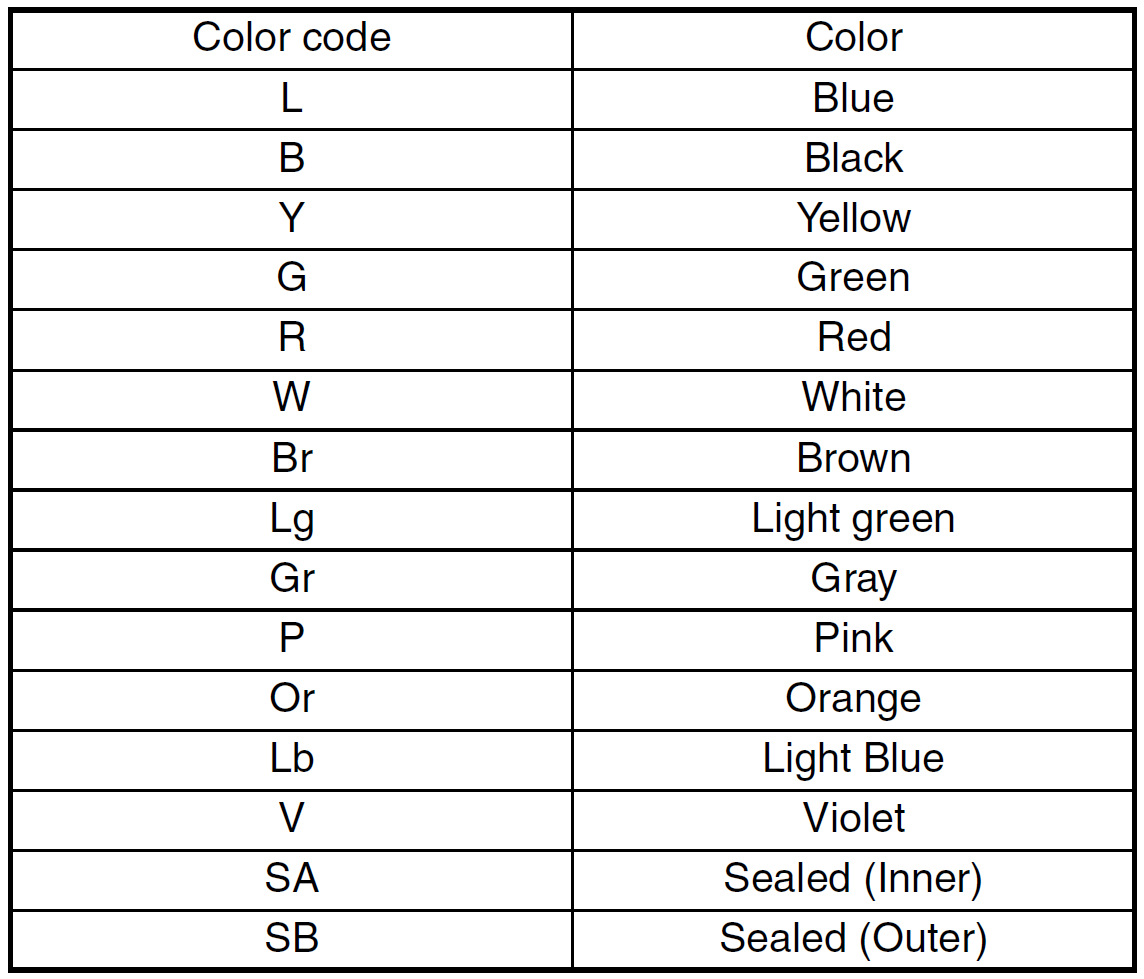
The wire color code, which consists of two letters (or three letters including Br or Lg), indicates the standard color (base color of the wire covering) by its first letter and the stripe marking by its second letter.
PART 2: Adding or repairing wires
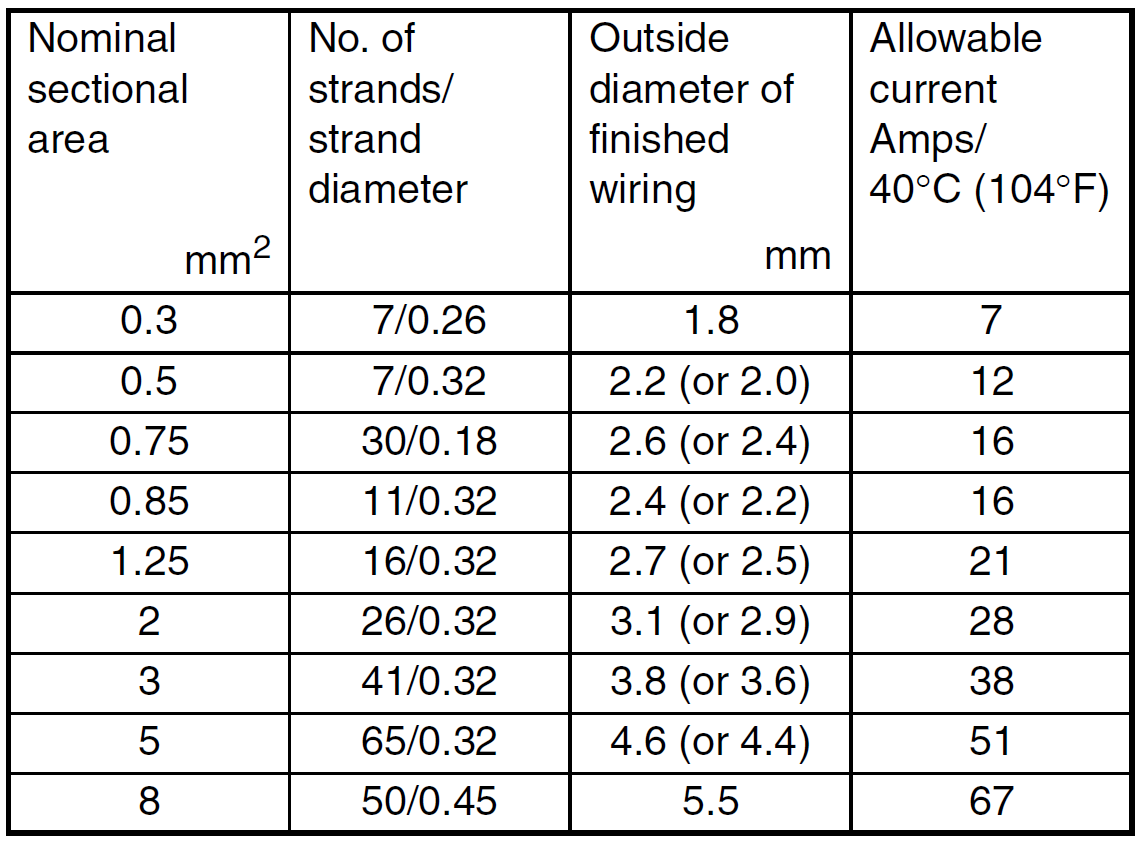
When replacing or repairing a wire, be sure to use the same size and type of the wire which was originally used. The allowable current in this table is tolerable amperage per wire @ 104F ( 40C) this can change with ambient temperature and bundles of multiple wires.
The most critical part of this whole process is your actual “splice” or merge of each wire. For those of you who just want a turbo’ed GC for daily driver duty, having a splice fail will most likely lead you to an expensive ride on a flat bed and a day of chasing electrical gremlins to find out what failed. For those of you who will take your car on track the way the good lord intended, having a splice fail can lead to your car crashing, you getting hit on track and you being hurt in the process. Consequences are often overlooked on miniscule things like this.
To solder or to crimp, that is the question…
Both methods are 100% perfectly fine. However, you must be aware that physical solder is a poor conductor when used inline with a wire like this and is only meant to hold a physical connection, the electrical connection of your twisted wires is what will pass a signal so make sure its a good one. Poor connections here will give you problems ranging from altered sensor signals, misfires, phantom check engine lights and more. If you want to wait to connect wires till the end, just zip tie or tape the wires together so you can make your connections in one shot. Soldering is generally accepted only on connections that will not have any flex/vibration like a wire to a terminal on a switch, circuit board etc, a crimp will last forever if done properly and will evenly allow flex/vibration to be distributed throughout the splice.
How to properly solder splice your wires:
Start with a nice cleanly stripped wire on both ends then put a small piece of heat shrink tubing over one side of your splice. Don’t twist the wires yet, you’ll need to push both wire ends together first, then twist them gently to make a secure connection. At this point you can now solder the connection. Keep the length of your splice short, around 10-14mm is plenty. Slide the heatshrink over and seal your splice, now your done!

How to properly crimp splice your wires
Start with a nice cleanly stripped wire on both ends then put a small piece of heat shrink tubing over one side of your splice. Don’t twist the wires leave the strands straight, you should then insert each wire into each end of the crimp. Make note of the gap between your insulation on the wire and the face of the crimp itself, this allows for flex and a more reliable connection. Also note, to save valuable space inside your harness, use un-insulated crimps which can be bought separately, or you can remove the colored plastic jackets from those parts store kits. At this point you can now crimp the connection. If your using a manual crimper, be careful to not over or under tighten your crimp, if your using a ratcheting crimper for un-insulated connectors, you probably dont need to read this. Slide the heatshrink over and seal your splice, now your done! Give the connection a light tug to make sure its tight.
Note, a 3rd but expensive option is the use of solder-shrink or crimp-shrink connectors. These cost quite a bit more than a normal un-insulated barrel crimp but have the solder to secure your splice along with heatshrink included in one step, they usually run about $1+ a pop. However im not a fan of slder versions, as you have no control over flow of solder and if not checked properly, you can easily have a loose connection. The crimp versions are great.
Tools and stuff
- Wire stripper – Any stripper will do, but a quality one will be worth the money 🙂
- Soldering iron – Any cheap iron is fine, one with a stand is helpful. Use an old wet sponge to clean the iron tip too
- Wire snips / flush cut pliers
- Box cutter / razor knife
- Electrical tape – Buy quality tape, the harbor frieght tape sucks
- Heat gun – Anything to shrink tubing will work, the yellow wagner from home depot is super cheap and works great
- Wire crimp tool – Please don’t use insulated crimps from a crappy kit, go buy non-insulated crimps and a proper tool
- Rubber gloves – The old tape residue will get everywhere and its nasty
- Rubbing alcohol – To clean old tape residue off everything you will touch
- Zip Ties
- Masking tape – Make flags on your wire ends to label the connection
- Beer – Always important, if your underage go get some Capri Sun.
- Wire sheathing/wrap – This comes in many varietys, you can reuse everything you take off, or replace some (or all) of it with new material its up to you.

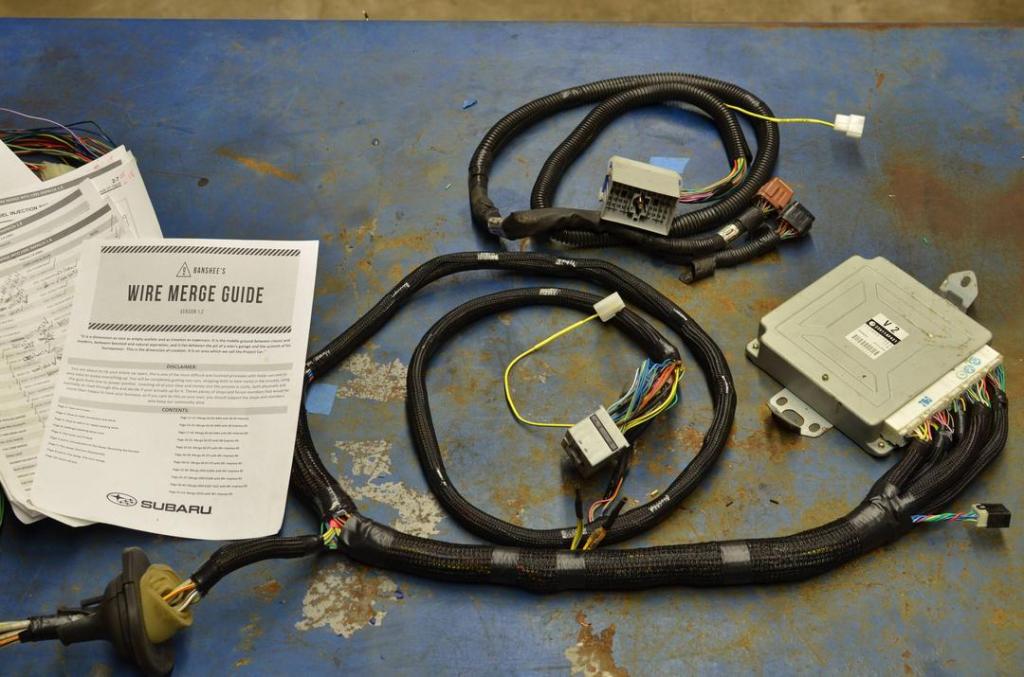
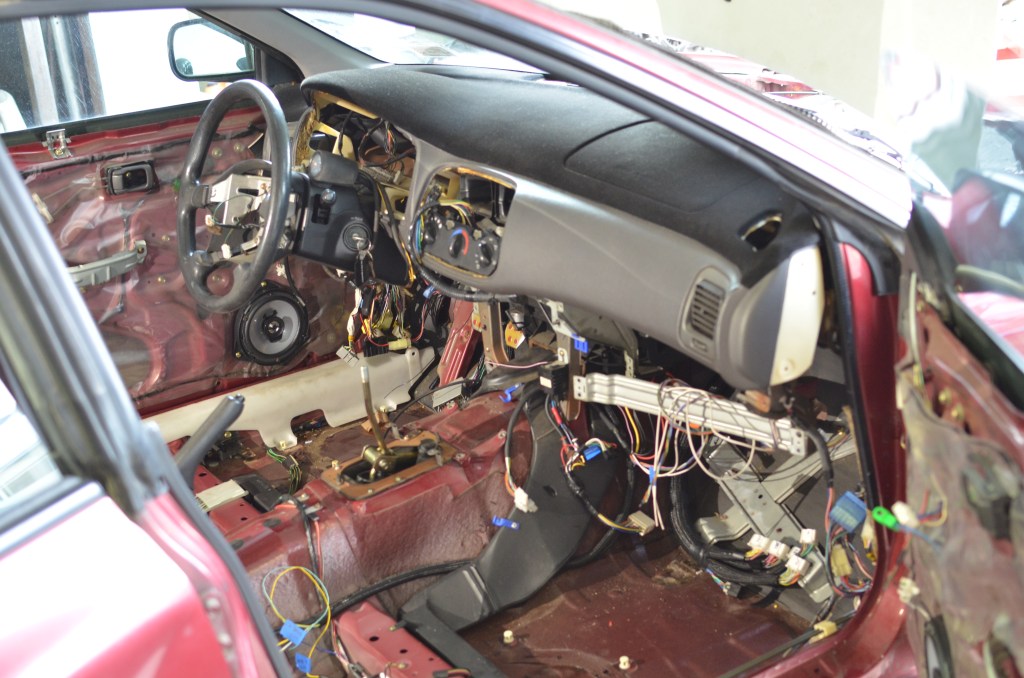
Get ready to gut your entire car, inside and out
What you should be left with at the end